APN settings for Android: Everything you need to know
Unlocked phones and alternative carriers are continually increasing in popularity. Presently, almost every manufacturer creates an unlocked model which will be bought directly from their website or through Amazon. You can most often access all the parts necessary to use the device and the required software on any GSM network in the world.
Even if you don’t have a phone associated with a contract carrier, you can still try other network carriers to decide which one best suit your needs. When it comes to phone service, switching things up and trying something new is primarily straightforward and easy. However, you may be required to figure out how an APN is defined or set on a device.
With that in mind, here’s an explanation of what an APN is and how to add or change the settings.
What is an APN?
Access Point Name (APN) refers to the carrier, network, or operator that your mobile phone or tablet uses to access the Internet. Normally, you don’t necessarily have to adjust or tamper with the APN settings because they have been automatically configured for you by the manufacturer. However, there are sometimes where you may want to check or adjust the APN settings on your device.
The APN (Access Point Name) also represents the name of the settings that smartphones and other internet-enabled devices read to create a connection to the gateway between your network operator and the internet (or world wide web). After your network provider goes through these settings, they then verify the IP addresses’ authenticity before connecting to the correct secure gateway.
After that process, you are then asked if you want to establish a connection through a virtual private network (VPN). Although the operator side does the main work, users must make sure that the correct settings are configured to be on their preferred network, depending on how they want to make a connection.
The network configuration required by your device to connect to your network operator is within an APN.
Depending on your network operator’s configuration, some settings are always compulsory, while the rest can be slightly adjusted to make changes for some parameters. However, some users must apply the same settings requested by their operator.
The good thing is that most devices have a default APN setting that automatically works for all calls. This makes them extremely useful, especially if you’re using carriers such as AT&T, US Cellular, T-Mobile, Boost, Virgin, Metro PCS, Sprint, Verizon, etc. In such situations, nothing else works properly, and the APN has to be added manually.
Unfortunately, the software can be customized on whatever device the carrier sells, meaning that the ability to change the VPN can be removed. Even if the phone is unlocked and a workable solution is posted somewhere online, you probably won’t be able to use the device on another network operator. Therefore, I recommend that you buy your phone from another person or company.
Why Do People Change Their APN Settings?
Here are some of the reasons people may want to change their APN settings:
– During troubleshooting
– When moving an unlocked phone to a new service provider
– To avoid data charges.
– Inability to access a data connection,
– To avoid data roaming charges.
Note: Some of the reasons people change their APN involve activities that are frowned against by their mobile providers, e.g., avoiding data charges. Therefore, you can only view or change your APN settings if your operator allows it. Contact your provider if you want to make changes and cannot access your APN.
Caution/Risks Involved in Changing APN Settings
Below are some important tips that you must consider before changing your APN settings:
It may disrupt your device’s connectivity. So you should be careful when changing it.
Ensure you write down the APN settings before making any changes (in case of errors).
You may lose data and network connectivity on your phone if you enter APN settings that are not working.
You may also be charged additional fees for entering non functioning APN settings.
Step-By-Step Configuration on How To Change APN Settings On Android Devices
Are you currently searching for a comprehensive guide on how to change the APN settings on your Android device? Then you’ve come to the right place. You must have encountered various data connection problems, making it difficult for you to use mobile data or access the internet. Having the correct APN settings on your Android device makes all the difference as you have the ability to access the internet easily.
In this article, I will provide you with step-by-step instructions on how to change APN settings on any Android device for that improved internet experience you desire! All operator networks have different APN settings used to differentiate their gateway between the cellular network and the internet. Using the appropriate Android APN settings on your phone will help you avoid some connection problems. For example, you may find it difficult to send or receive MMS (multimedia messaging service) without the correct APN settings.
Android APN Settings
Owners can easily switch carriers now that unlocked smartphones are available. When this happens, a new APN must be used to identify the operator. Unlocked Android smartphones have APN settings, although their location varies by the phone manufacturer.
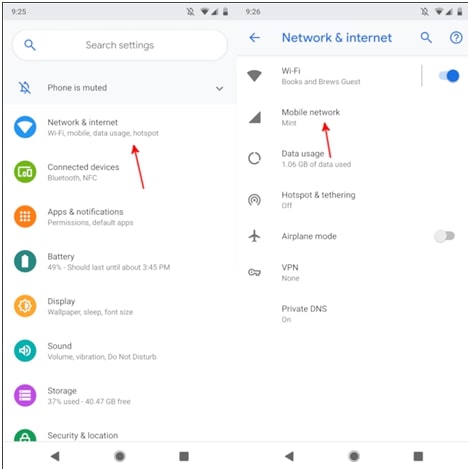
Generally, you can find the APN settings on your Android device by going to:
Settings> Mobile networks> Access point names.
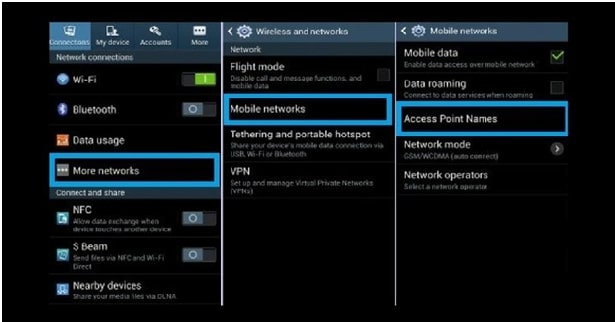
If you can’t find it there, check the “Network & Internet” or “Wireless & networks” section of your phone’s settings or Mobile networks.
When you find the correct APN section, follow these steps:
Open the APN section.
Don’t change the existing APN. Instead, touch the plus sign (+) to display “Change access point.”
Enter your carrier information in the fields provided. Where there’s no other information to enter, leave the fields blank. You must write everything exactly how you see it because even a lost space or misspelling can ruin everything.
Save the APN. Check the menu (represented by three dots) if you can’t find the “Save” option.
Return to the APN section and select the new APN.
Settings For New Network
Note: Go back and activate the new APN settings once your APN information is saved. Your phone may also lose its access to data connection for some time when it connects to the new network using the new network settings.
Restart your phone if necessary (that is, if you haven’t established a connection after a while)
Some providers may have two APNs (if they use a separate gateway for data or MMS), but you only need one APN in most cases. That means you have to enter another APN if you want to separate it from your data plan. However, you can still check your carrier’s support site for a full explanation of the two APN settings.
Your phone is now ready for calls, data, SMS, and MMS. You can now go ahead to configure the warning settings or data saving feature on your phone so that you can easily monitor how much data you are consuming and when you are approaching your limit.
Modification of APN Parameters
If you want to get the best internet connection (fast and reliable) on your Android phone, you need to install the correct APN settings. It is also the best way of increasing the internet speed on your phone. Network providers will generally provide the correct APN settings depending on your data plan and connectivity type. Going further, users can update their APN settings in “Internet” settings option on mobile by simply providing the access point’s name, given by the customer service.
What are the Visible APN settings for Android?
Usually, your phone will automatically set itself up once you insert the Visible SIM card and run the setup app. The LTE data network uses the APN settings to know the specific type of service that should be given to the phone. A similar situation occurs when a device connects to the internet. However, there’s a bit more involved with cell phone service.
Once you insert the Visible SIM card and go through all the Visible app setup procedures, all connections should be automatically loaded. You may need to enter them manually if the settings are not automatically updated.
Here are Visible’s APN settings for Android Devices
Name: Visible
APN: vzwinternet
Proxy: Leave blank
Port: Leave blank
Username: Leave blank
Password: Leave blank
Server: Leave blank
MMSC: http://mms.vtext.com/servlets/mms
MMS proxy: 80 ; MMS port: Leave blank; MMS Protocol: Leave blank
MCC: Leave blank
MNC: Leave blank
Authentication type: Leave blank
APN type: default,supl,mms ; APN Protocol: IPv4 ; APN roaming protocol: Leave blank; APN enable/disable: Leave blank
Are You Still Having a Connection Problem?
Try contacting their customer support through the app if you’re still having connection issues. The problem may be a result of a network-wide issue or a more straightforward solution. Most times, resolving a connection issue can be as easy as restarting your device. If every solution above proved abortive, a factory reset maybe your best bet. A factory reset will force all settings to reset. It could also help resolve any issue where your software may have been corrupted.
